EclipseでWildFlyのjboss-deployment-structure.xmlをローカルサーバーに配置する方法
EclipseのローカルWildFly動作時に、jboss-deployment-structure.xmlをWEB-INFに配置する方法です。
プロジェクトのプロパティ内で行えます。
手順
1.「src」配下に任意のフォルダを作成する
ここでは「WEB-INF」フォルダを作成する。

2.プロジェクトのプロパティで「デプロイメント・アセンブリ」を選択し、右側にある「追加」ボタンを押下する

3.ディレクティブ・タイプ選択で「フォルダ」選択し、「次へ」を押下する

4.1で作成したフォルダを選択し、「完了」を押下する

5.追加したソースのデプロイ・パスをクリックし、サーバー上でのパスである「WEB-INF」を入力し、設定を保存する

Linuxでシェルを使ってDropboxにバックアップをする方法
サーバーを運用していると障害発生時にデータが消えても大丈夫なようにバックアップを取る必要があります。
物理的なサーバーに触れられるのであれば、外付けHDDやテープ装置等にバックアップを取ったりいろいろ手段はあります。
しかし、VPS等のクラウド上のサーバーとなると外付けHDD等を接続することができません。
サーバー外にバックアップを気楽に取れるDropboxを使った方法を紹介します。
手順
Dropbox developerにアプリを登録する
1.Dropbox developerサイトにアクセスする
www.dropbox.com
2.「Create App」を押下する

3.「1. Choose an API」で「Dropbox API」を選択する

4.「2. Choose your app's permissions model」で「Scoped access」を選択する

5.「3. Choose the type of access you need」で「App folder」を選択する

6.「4. Name your app」で任意の名前を入力する

7.画面右下の「Create App」を押下する

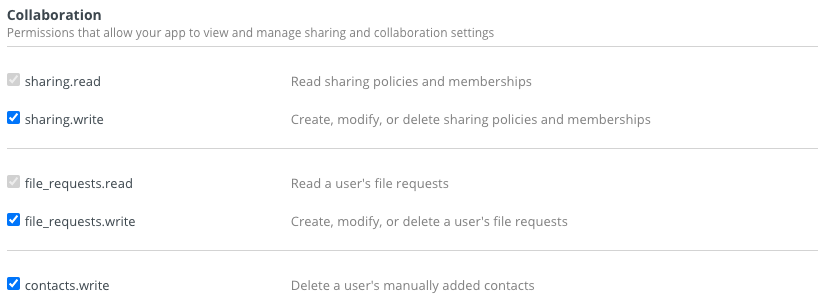
8.パーミッションを設定する
よくわからないので、画像のように設定して下さい。


9.後ほど使うアクセストークンを取得する

アクセストークンを生成すると、Dropboxのルート配下に「アプリ」フォルダ、その配下に先程つけた名前のフォルダが自動的に作成されます。
Linuxでdropbox_uploader.shを設定する
1.dropbox_uploader.shを任意のディレクトリにダウンロードする
$ wget https://raw.githubusercontent.com/andreafabrizi/Dropbox-Uploader/master/dropbox_uploader.sh
2.dropbox_uploader.shを実行する
$ ./dropbox_uploader.sh
3.Access tokenを聞かれるので、Dropbox developerで取得したアクセストークンを貼り付け、Enter押下後、「y」を入力しEnterを押下する
 This is the first time you run this script, please follow the instructions:

 1) Open the following URL in your Browser, and log in using your account: https://www.dropbox.com/developers/apps
 2) Click on "Create App", then select "Dropbox API app"
 3) Now go on with the configuration, choosing the app permissions and access restrictions to your DropBox folder
 4) Enter the "App Name" that you prefer (e.g. MyUploader37321544428431)

 Now, click on the "Create App" button.

 When your new App is successfully created, please click on the Generate button
 under the 'Generated access token' section, then copy and paste the new access token here:

 # Access token:ここにアクセストークンを貼り付ける

 > The access token is xxxxxxxxxxx. Looks ok? [y/N]: yと入力する
4.dropboxとの連携が設定される
アクセストークンを変更したい場合、dropbox_uploader.shを実行したユーザーのホームディレクトリ配下にある「.dropbox_uploader.sh」を編集し、該当のアクセストークンを削除するか、ファイルごと削除します。
sudoで実行した場合、rootのホームディレクトリ配下のファイルを編集します。
dropbox_uploader.shを使ってアップロードする
アップロードのコマンドは以下の通りです。
$ ./dropbox_uploader.sh upload アップロードするファイル名 アップロード後のdropbox内でのファイル名

例:
$ ./dropbox_uploader.sh upload /home/user/hoge.tar.gz hoge.tar.gz
シェルを実行すると「dropboxルート/アプリ/アプリ名」に自動的にアップロードされます。
同じ名前でアップロードするようにしていると、Dropbpx無料版では最大30日間のバージョン管理がされます。
また、ファイル内容が前回と異なる場合のみバージョン管理されます。
実際の運用は、別のシェル内でdropbox_uploader.shを呼び出し、cronでシェルが実行されるようにする感じになります。
無料でDropboxの容量を増やす方法
以下のリンク経由でDropboxをインストールすると無料で500MBが永久的に付与されます。
Dropbox - You're invited to join Dropbox!
MacでPostfixを使ってGmail経由でメールを送信する
メールを送信するサービス等を開発していると、メール送信テストをする必要が出てきます。
開発環境でPostfixを使ってGmail経由でメール送信する方法を紹介します。
補足
Postfixのバージョン確認
$ postconf | grep mail_version
mail_version = 3.2.2
milter_macro_v = $mail_name $mail_version
手順
1.main.cfでメールの設定を行う
$ sudo vi /etc/postfix/main.cf
relayhost = [smtp.gmail.com]:587
mail_spool_directory = /var/spool/mail
smtp_sasl_auth_enable = yes
smtp_sasl_password_maps = hash:/etc/postfix/sasl_passwd
smtp_sasl_security_options = noanonymous
smtp_sasl_mechanism_filter = plain
smtp_tls_security_level = may
Postfix2.3以降は「smtp_use_tls = yes」ではなく「smtp_tls_security_level = may」を使います。
http://www.postfix-jp.info/trans-2.3/jhtml/postconf.5.html#smtp_use_tls
smtp_use_tls (デフォルト: no)
この機能はPostfix 2.2以降で使えます。Postfix 2.3以降では smtp_tls_security_level を代わりに使ってください。
2.Googleでアプリパスワードを取得する
以下のサイトを参考にアプリパスワードを取得します。
デバイスは「mac」を選択します。
www.howtonote.jp
3.送信時の認証情報を設定する
# 認証情報の作成
$ sudo vi /etc/postfix/sasl_passwd
[smtp.gmail.com]:587 hoge@gmail.com:取得したパスワード

# 権限変更
$ sudo chmod 600 /etc/postfix/sasl_passwd

# ハッシュ化
$ sudo postmap /etc/postfix/sasl_passwd
4.スプールを設定する
# ディレクトリ作成
$ sudo mkdir /var/spool/mail

# 所有者・グループの変更
$ sudo chown ログインユーザー名:staff /var/spool/mail

# 権限の変更
$ sudo chmod 700 /var/spool/mail
5.Postfixをリロードする
# すでに起動している場合
$ sudo postfix reload

# 停止
$ sudo postfix start

# 起動
$ sudo postfix stop
5.メール送信テストを行う
送信前に後で説明するメール送信ログの出力を行います。
$ mail hoge@gmail.com(送信先アドレス)
Subject: test # タイトル
test # 本文
. # メールを送信する
6.メールが届いているか確認する
メール送信ログ
Macではmaillogが生成されないようなので、メール送信前に以下のコマンドを実行しておきます。
$ log stream --predicate '(process == "smtpd") || (process == "smtp")' --info
次のようなメッセージが表示された場合、メール送信に失敗しています。
(host smtp.gmail.com[74.125.203.108] said: 530-5.7.0 Authentication Required. Learn more at 530 5.7.0 https://support.google.com/mail/?p=WantAuthError o8sm917374pjf.37 - gsmtp (in reply to MAIL FROM command))
送信が成功した場合、次のようなメッセージが表示されればOKです。
to=<hoge@gmail.com>, relay=smtp.gmail.com[2404:6800:4008:c01::6d]:587, delay=2.6, delays=0.02/0.04/1.5/1, dsn=2.0.0, status=sent (250 2.0.0 OK 1595305690 z25sm18507895pfg.140 - gsmtp)
MecurialをGitに変換する
愛用しているバージョン管理サービスのbitbucketでMercurialの提供を終了し、Gitに完全移行するということで、既存のMercurialリポジトリをGitに移行してみました。
記事を公開するまでの期間が長かったため、抜けや間違い等があるかもしれないので、参考程度にしてみてください。
動作環境
Mac
Homebrew
環境構築
MecurialをGitに変換するための環境を構築します。
Pythonの確認
$ python --version
Python 2.7.10

# インストールされてなければ
$ brew install python2
pipの確認(Pythonのパッケージ管理)
# インストール確認
$ pip
-bash: pip: command not found

# curlでpipを取得
$ curl https://bootstrap.pypa.io/get-pip.py -o get-pip.py
  % Total    % Received % Xferd  Average Speed   Time    Time     Time  Current
                                 Dload  Upload   Total   Spent    Left  Speed
100 1764k  100 1764k    0     0  3484k      0 --:--:-- --:--:-- --:--:-- 3488k

# pipをインストール
$ python get-pip.py --user
WARNING: pip is being invoked by an old script wrapper. This will fail in a future version of pip.
Please see https://github.com/pypa/pip/issues/5599 for advice on fixing the underlying issue.
To avoid this problem you can invoke Python with '-m pip' instead of running pip directly.
DEPRECATION: Python 2.7 reached the end of its life on January 1st, 2020. Please upgrade your Python as Python 2.7 is no longer maintained. A future version of pip will drop support for Python 2.7. More details about Python 2 support in pip, can be found at https://pip.pypa.io/en/latest/development/release-process/#python-2-support
Collecting pip
  Using cached pip-20.0.2-py2.py3-none-any.whl (1.4 MB)
Collecting wheel
  Using cached wheel-0.33.6-py2.py3-none-any.whl (21 kB)
Installing collected packages: pip, wheel
  WARNING: The scripts pip, pip2 and pip2.7 are installed in '/Users/xxxxx/Library/Python/2.7/bin' which is not on PATH.
  Consider adding this directory to PATH or, if you prefer to suppress this warning, use --no-warn-script-location.
  WARNING: The script wheel is installed in '/Users/xxxxx/Library/Python/2.7/bin' which is not on PATH.
  Consider adding this directory to PATH or, if you prefer to suppress this warning, use --no-warn-script-location.
Successfully installed pip-20.0.2 wheel-0.33.6

# 環境変数を設定
$ vi ~/.bash_profile
export PATH=$PATH:$HOME/Library/Python/2.7/bin

# 環境変数の有効化
$ source ~/.bash_profile
PythonにMecurialをインストール
$ pip install mercurial
DEPRECATION: Python 2.7 reached the end of its life on January 1st, 2020. Please upgrade your Python as Python 2.7 is no longer maintained. A future version of pip will drop support for Python 2.7. More details about Python 2 support in pip, can be found at https://pip.pypa.io/en/latest/development/release-process/#python-2-support
Defaulting to user installation because normal site-packages is not writeable
Collecting mercurial
  Downloading mercurial-5.2.2.tar.gz (7.3 MB)
     |████████████████████████████████| 7.3 MB 2.3 MB/s
Building wheels for collected packages: mercurial
  Building wheel for mercurial (setup.py) ... done
  Created wheel for mercurial: filename=mercurial-5.2.2-cp27-cp27m-macosx_10_14_intel.whl size=2728813 sha256=f0b70639c66146acc92e93b5d1325c68d5ab60eee4f62208d43ba4ad1f47821f
  Stored in directory: /Users/xxxxx/Library/Caches/pip/wheels/64/d4/95/33110d3cbdbafbd02d90913d03b12064730908962c08990d68
Successfully built mercurial
Installing collected packages: mercurial
Successfully installed mercurial-5.2.2
MecurialをGitに変換する
変換ツールをダウンロードする
$ git clone https://github.com/frej/fast-export.git
変換
# Mecurialリポジトリに移動
$ cd HgRepo

# コミットログの登録ユーザー名を一覧に出力
$ hg log | grep user: | sort | uniq | sed 's/user: *//' > ../authors

# ユーザー名を変換でできる形式に変更
$ vi ../authors
# Mecurialでのユーザー一覧
User1
Yamada Taro
# 上記を以下の形式に書き換えて保存
"User1"="User1 <user1@gmail.com>"
"Yamada Taro"="Yamada Taro <yamada_taro@yahoo.co.jp>"

# Mecurialリポジトリ内でGitリポジトリを作成
$ git init

# 変換時にエラーが出るので設定を変更しておく
$ git config core.ignoreCase false

# 変換を実行する
$ ../fast-export/hg-fast-export.sh -r . -A ../authors
変換したソースをリモートにプッシュする
# リモート設定
$ git remote add origin https://xxxxx@bitbucket.org/xxxxx/GitRepo.git

# プッシュ
$ git push origin master

# タグを一括でプッシュ
$ git push origin master --tags
docker上のPHPでEXIFを使えるようにする
PHPで画像からEXIF情報を取得するには、exif_read_data関数を使います。
しかし、この関数だけでは動作しないのでEXIFモジュールを追加する必要があります。
docker上でEXIFモジュールを追加する方法をまとめました。
手順
1.Dockerfileに以下を追記します。
RUN && apt-get install -y \
		libfreetype6-dev \
		libjpeg62-turbo-dev \
		libpng-dev \
        && docker-php-ext-configure gd --with-freetype-dir=/usr/include/ --with-jpeg-dir=/usr/include/ \
	&& docker-php-ext-install -j$(nproc) gd  exif \
2.Dockerfileを実行しイメージを作成します。
3.PHPでexif_read_dataを実行しエラーが出ないか確認します。
MacBook Pro 2019 でログイン時に画面が乱れる現象
2019年末に6年使ったMacBook Proを2019年モデルに買い替えました。
バタフライキーボードに違和感を覚えながらも、使い続けるとタイピングが心地よくなってきて慣れてきました。
そんな中、使い出してから数回目の起動時に、画面が乱れる現象が発生するようになりました。
画面が乱れる現象とは?
本体起動時にまずパスワード入力画面が表示されます。
そこでパスワードを入力しエンターキーを押すと、データ読み込みの進捗バーが表示されます。
そのバーが半分を少し超えた所で一瞬画面が乱れます。
乱れた後は、何事もなかったかのようにデスクトップが表示されます。
画面が乱れたときの画像は次のような感じです。
ログイン時だけなのであまり気にしてなかったのですが、普通に使っている時も極稀に違うタイプの画面のチラつきが発生します。
対処方法は?
Macでは定番のメンテナンスツール「OnyX」でメンテナンスを行うと画面のチラつきは発生しなくなります。
しかし、数回起動を行うとまた同じような現象が発生します。
特に外部モニターに繋げた後の起動は必ず発生しているような感じです。

2020/05/16 追記
ディスクの暗号化(FileVault)をオフにすると発生しなくなりました。

まとめ
対処方法を書きましたが、一時的な対処であり根本的な解決には至っていません。
ネットで調べるとMacのハードウェアリセットを試したけど効果がなかったとあったので、リセットはまだ試してません。
何かご存じの方いらっしゃいましたら、コメント頂けたら幸いです。
Gradle4.xから6.xで変更する依存関係の定義
Graldeを4.10.2から6.0.1にバージョンアップしたときに警告やエラーが出たので、そのときに変更した依存関係周りを簡単にまとめました。
個人的にGradleはあまり詳しくないので、今回影響があった部分のみの記載です。
さらに詳細を知りたい方は、参考サイトをご覧ください。
バージョンアップ時のエラー
Gradle6にしてビルド等を走らせると、lombokを使用している場合、認識されずコンパイルが通りません。
いつの間にかGradleの設定方法が変わっていたので、その辺を変更します。
依存関係
ライブラリの依存定義に使う設定名が以下のように変わっています。
compile -> implementation
compile files -> implementation files
runtime -> runtimeOnly
providedCompile -> compileOnly
注釈処理
「annotationProcessor」というものを使う必要があります。
以下、Domaとlombokの場合です。
// Doma
annotationProcessor 'org.seasar.doma:doma:2.19.3'
implementation 'org.seasar.doma:doma:2.19.3'

// lombok
annotationProcessor 'org.projectlombok:lombok:1.18.8'
compileOnly 'org.projectlombok:lombok:1.18.8'
Domaの場合、追加で以下も必要です。書き方が変わっています。
task copyDomaResources(type: Sync)  {
    from sourceSets.main.resources.srcDirs
    into compileJava.destinationDir
    include 'doma.compile.config'
    include 'META-INF/**/*.sql'
    include 'META-INF/**/*.script'
}

compileJava {
	dependsOn copyDomaResources
}
警告の確認
古い定義でもそのまま使えますが、バージョンアップ毎に非推奨の定義があり、将来的に削除されます。
スムーズにバージョンアップするためにも、非推奨定義は別の定義に変更しておいた方が良いです。
非推奨や警告定義の確認は、Gradleの各コマンドで「--warning-mode all」を付与すると出力されます。
gradle build --warning-mode all


